Subject Guide

Mountain West
Malachite’s Big Hole
Making a Powderhorn:
The following discussion on making powder horns should be viewed as merely guidelines,
not an absolute set of step by step instructions. The actual methods used will depend
in part on both the tools and skills possessed by the individual.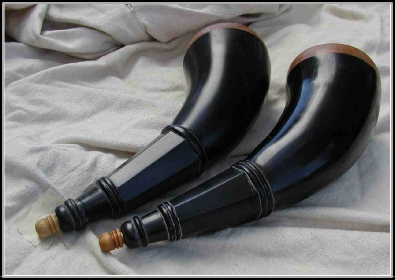 Anyone with a desire
to do so should be able to make a tight, functional and nice looking powder horn
without difficulty. It shouldn't take more than about three hours to go from a raw
horn to a simple powder horn ready to take powder. Carving enhances the appearance
and character of a horn. It takes me about twenty to twenty five hours to go from
a raw horn to a finished, relatively simple-carved horn as shown in the above picture.
Anyone with a desire
to do so should be able to make a tight, functional and nice looking powder horn
without difficulty. It shouldn't take more than about three hours to go from a raw
horn to a simple powder horn ready to take powder. Carving enhances the appearance
and character of a horn. It takes me about twenty to twenty five hours to go from
a raw horn to a finished, relatively simple-carved horn as shown in the above picture.
Tools and Supplies: Working a horn is similar in many ways to woodworking, and many of the same tools can be used. A rasp, coarse and fine files, needle files, scraper, drill, hacksaw, wood-saw, various grades of sand paper and coarse and fine steel wool are all that is necessary to create a powder horn. A disc sander and Dremel tool are useful as well. I use electrical tape as a guide for carving the rings around the circumference of the horn.
The Horn: The horn may be from either a cow or buffalo (bison). Cow horns can come in various colors ranging from whites and cream to browns, greenish-grey and black. Buffalo horns are ebony black in color. Horns which are curved in a single plane are best because they can be worn on either the left or right side. Horns which have a slight curve in a second plane can be acceptable but make sure it curve matches the side you intend to wear the horn on. Horns which are corkscrew shaped should be avoided for making powder horns.
Raw horns can be obtained from a number of sources. Probably the cheapest source is the local meat packing plant. The freshest horns will be from this source, although horns from this source may still have bone and nerve tissue in the core which must first be removed. Boiling the horn will loosen the core which can then be pulled out. This should be done as soon as possible after obtaining the horn because this material will become quite odorous as it decays, an olfactory feature which is unlikely to be appreciated by your spouse or room-mates. Raw horns can also be purchased from mail-order and internet supply outfits, at muzzle-loader conventions, and on trader’s row at some rendezvous.
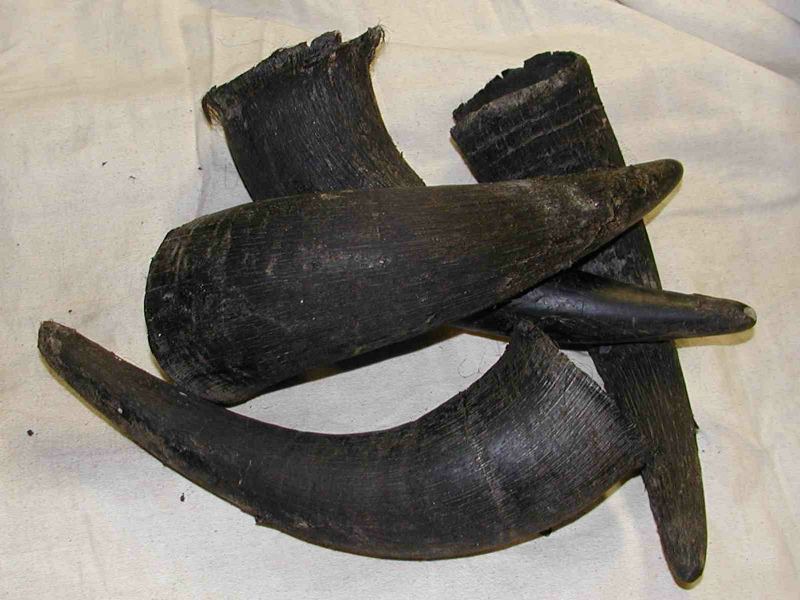 Horns are not uniform, each is unique as to size, curve, wear and weathering, so
obtaining horns from a packing plant or at a convention allows you to be selective
in the horns you take away with you. With horns obtained from a mail order house
or on the internet you won’t know exactly what you’re getting until it arrives. Click
on the thumbnail image to the left to see the rough, scaly, gouged and nicked exterior
surface typical of raw buffalo horns prior to any work. (Click on any of the following
thumbnails for a more detailed view.)
Horns are not uniform, each is unique as to size, curve, wear and weathering, so
obtaining horns from a packing plant or at a convention allows you to be selective
in the horns you take away with you. With horns obtained from a mail order house
or on the internet you won’t know exactly what you’re getting until it arrives. Click
on the thumbnail image to the left to see the rough, scaly, gouged and nicked exterior
surface typical of raw buffalo horns prior to any work. (Click on any of the following
thumbnails for a more detailed view.)
The steps given below are for making a powder horn from a buffalo horn cap. These steps are only suggested, based on my own experience constructing horns. Depending on what tools you have available, and your personal skill set, you’ll find your own unique way of making a powder horn. When using power equipment or sharp edged cutting tools, always be sure to follow manufacturers instructions.
Trimming the Base: The first step in working a buffalo horn is to remove the lowest part of the base where it flares out and is attached to the buffalo’s skull. This portion of the horn really can’t be used as it tends to be much thinner that the rest of the horn, and it would be difficult to incorporate this shape in the construction of the powder horn. The flare also interferes somewhat with removing the scale. Try to cut off this flared portion as close to perpendicular to the horn axis at the base as possible. A fine toothed saw, such as a hack-saw, or band-saw works well for this task.
Remove the Scale: Remove the scale and other deep nicks and gouges in the horn. The scale is very hard, brittle and dry material that covers roughly the lower two thirds of the horn. This material cannot be worked and should be removed. The scale can be softened somewhat and more easily removed by soaking the horn in water for a couple of hours. I use a coarse rasp, flat on one side, rounded on the other to remove the scale. I hold the horn in my lap and rotate the horn slightly with every stroke of the rasp. A leather glove is advisable to protect the knuckles of the left hand (I'm right handed). You can tell when you’ve removed all of the scale, there is a definite change in the feel of the rasp as it moves over the work surface. A stationary belt sander with no support for the belt also works well for removing the scale much more rapidly than with a rasp. The speed that material can be removed with a belt sander can be both a benefit and a weakness-in only a matter of seconds too much material can be removed from the side wall of the horn. So if you are using power equipment proceed caustiously. Finally, buffalo are not truly domestic animals, but are rather ornery creatures in captivity. A result often is rather deep gouges and nicks in the horn. Unless the gouges and nicks are exceptionally deep, they can be removed with a combination of rasps and files. When removing a gouge or nick be sure to try to maintain the overall curve of the horn.
Remove Rasp Marks: After removal of the scale, I work over the horn with a coarse or medium file to remove most of the deep tooth marks left by the rasp. I don’t make any great effort to smooth the horn surface at this stage because I carve decorative rings and flats into the horn, and most of these remaining imperfections will disappear as the horn is further shaped.
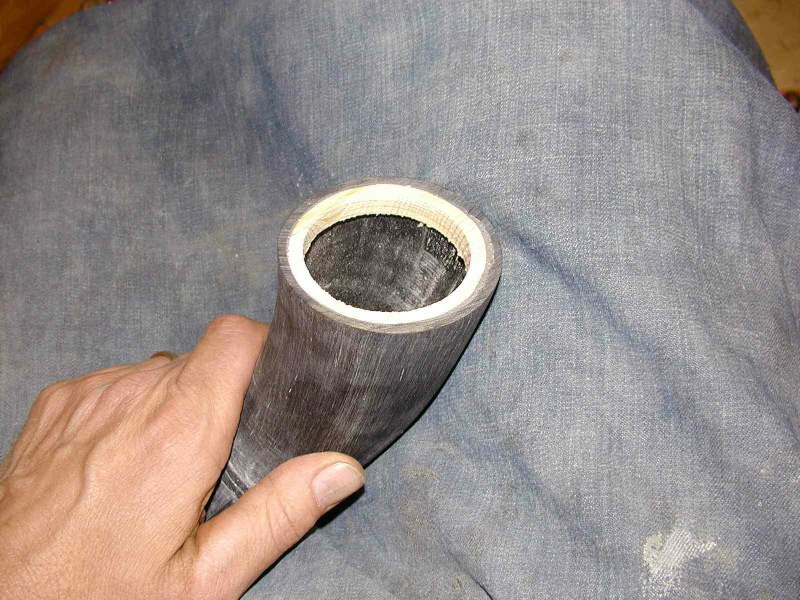
Drill the Spout Hole: The spout hole should be drilled at this point. If the horn
is going to be spoiled, it will most likely be during drilling of the spout hole
and you don’t want to have too many hours of work invested in the horn if that should
happen. To prepare the tip of the horn for drilling, cut off enough of the tip so
that the spout hole can be drilled and still have a about 1/8 to 3/16 inch wall thickness
around the hole. I generally remove about 3/8 inch of the tip, but this will depend
on the shape of the horn, and the diameter of the spout hole. If the tip of the
spout is to be carved, a greater wall thickness should be left at the tip. I start
drilling the spout hole using a 15/64 inch diameter bit, progressively enlarging
the hole by 1/64 intervals up to between 9/32 inch and 3/8 inch. In drilling the
spout hole, do not drill parallel the axis of the horn at the tip, but rather towards
the center of the horn where the cavity begins. You can determine this location
by running a stiff piece of wire down the inside of the horn so that the wire contacts
the wall of the inner wall of the horn. Then place the wire along the outside of
the horn with the same hold point. Drill to the center of the horn at this location
and the hole shouldn’t come out the side of the horn. Click on the thumbnail to
see a cross-section of a buffalo horn.
this location
by running a stiff piece of wire down the inside of the horn so that the wire contacts
the wall of the inner wall of the horn. Then place the wire along the outside of
the horn with the same hold point. Drill to the center of the horn at this location
and the hole shouldn’t come out the side of the horn. Click on the thumbnail to
see a cross-section of a buffalo horn.
Shaping the Base of the Horn: The base of the horn should now be shaped. Most buffalo
horns will start off having an irregularly shaped cross-section at the base. Horns
will be far more appealing to the eye if the base presents a circular cross-section.
The horn will also be easier to lay out patterns, and to work and fit butt plugs
if the base opening is circular. Horn material, when heated, becomes plastic, and
can be re-shaped to have a circular cross-section. Heating can be accomplished by
boiling the horn in water, dipping in hot oil, or by using a paint stripper/heat
gun. Boiling in water is not the most effective way to reshaping a horn because
the maximum temperature that can be obtained is just over 200 degrees F. Although
the horn can be shaped, it retains a memory of its original shape, and over time
will attempt to return to that shape. Even if the new shape is supported, for example
by the butt plug, the horn material will still be under stress which may result in
cracking at some time in the future. However, the “memory” can be erased by heating
the horn material to about 325 degrees F. The most controlled way of heating to
this temperature is through the use of oil heated in the oven at 325. The end of
the horn should be dipped in the oil for only a few seconds to prevent scorching.
I have never used the heated oil method and do not recommend it because of the risks
of personal injury from scalding and the fire danger associated with hot oil. My
preferred method is to heat the base of the horn using a paint stripper/heat gun.
Heat the base of the horn uniformly for several inches along the base edge, around
the entire circumference and both inside and out. Wear heavy gloves while heating
the horn because it will become very hot to the touch. As the horn is heated flex
it to see if it is becoming pliable. If frothy brown bubbles form on the surface,
the horn has gotten too hot and is beginning to scorch. If the horn is slightly
scorched, the brown froth can be removed by sanding after it has cooled. After the
base has been heated, insert a 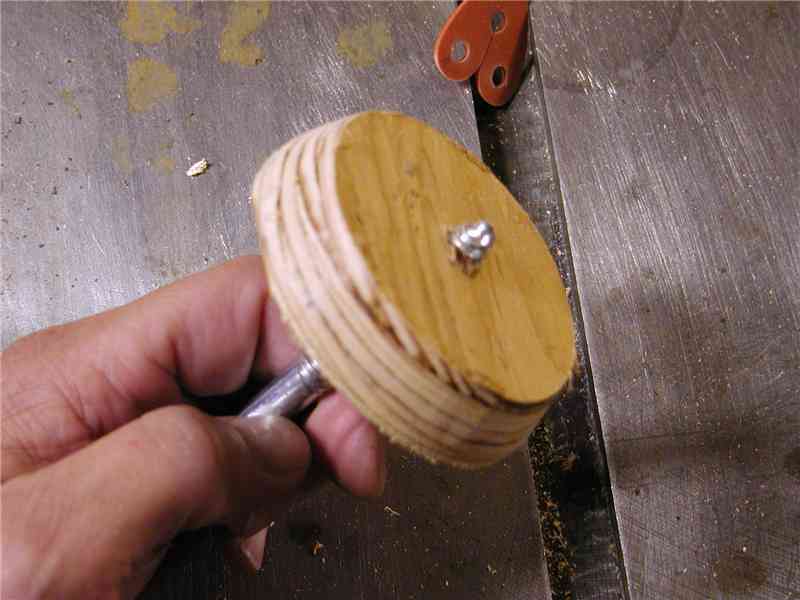 cylindrical or cone shaped form into the base and
allow it to cool. To the left is a thumbnail of my form. It's simply a plug cut
with a hole-cutter bit and then tapered. I've got several of these in different
sizes. Sometimes the plug is quite tight in the horn after it cools and the large
screw eye give something firm to grasp to remove it.
cylindrical or cone shaped form into the base and
allow it to cool. To the left is a thumbnail of my form. It's simply a plug cut
with a hole-cutter bit and then tapered. I've got several of these in different
sizes. Sometimes the plug is quite tight in the horn after it cools and the large
screw eye give something firm to grasp to remove it.
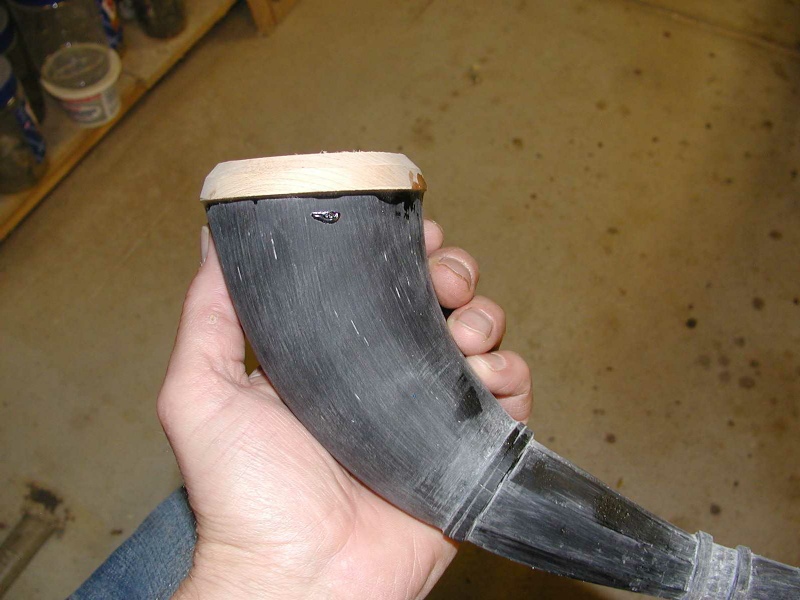
Fitting the Butte Plug: The design of plugs can range from very simple to extremely
ornate. Some plugs are inset with a small circular mirror or compass. There are
basically two types of butte plugs, those which are flush with the end of the horn,
and those which are proud of the end and flush with the sides of the horn. The base
of this horn was previously softened using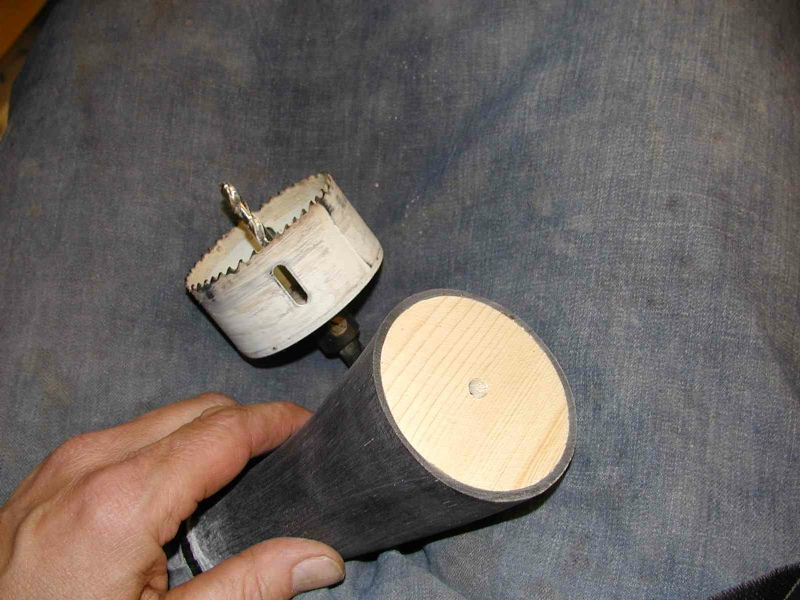 heat and reformed into a more circular
shape. I make butt plugs using a two piece method. In this photo, the inner butte
plug has been fitted in place. I’ve used a hole cutter to cut the butte plug, and
then taper it to fit the base of the horn. Currently I’m using ½ inch pine material
for the internal butt plug. Once I’ve got a good fit, I epoxy the plug inside the
base of the horn. This forms a good air-tight seal around the edge. After the epoxy
cures I smooth and flatten the plug flush to the bottom of the horn using a disk
sander.
heat and reformed into a more circular
shape. I make butt plugs using a two piece method. In this photo, the inner butte
plug has been fitted in place. I’ve used a hole cutter to cut the butte plug, and
then taper it to fit the base of the horn. Currently I’m using ½ inch pine material
for the internal butt plug. Once I’ve got a good fit, I epoxy the plug inside the
base of the horn. This forms a good air-tight seal around the edge. After the epoxy
cures I smooth and flatten the plug flush to the bottom of the horn using a disk
sander.
 Next remove the center of the inner butt plug with a hole cutter. If you skip this
step, no-one will ever know. However, removal of the center of the inner butt plug
results in a powder horn that weighs less, and with somewhat greater powder carrying
capacity.
Next remove the center of the inner butt plug with a hole cutter. If you skip this
step, no-one will ever know. However, removal of the center of the inner butt plug
results in a powder horn that weighs less, and with somewhat greater powder carrying
capacity.
The Outer Butt Plug: Trace the outline of the base of the horn onto the stock that
will be used for the outer butte plug. The butt plu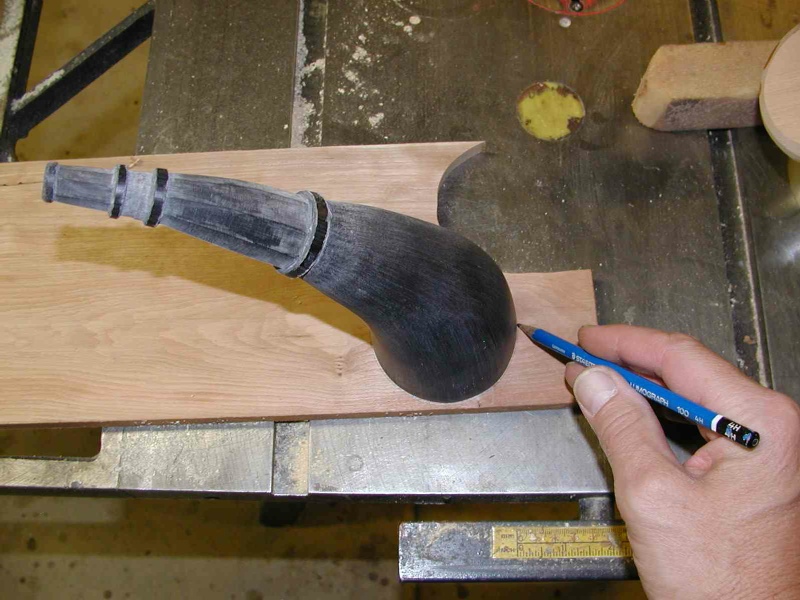 g will be more pleasing to the
eye if the wood grain runs either parallel to the curve of the horn, or perpendicular
to the curve. For some of my early horns I used ¾ inch stock for the outer butte
plug, but I’ve since gone with ½ inch material both to minimize weight and for reasons
of appearance.
g will be more pleasing to the
eye if the wood grain runs either parallel to the curve of the horn, or perpendicular
to the curve. For some of my early horns I used ¾ inch stock for the outer butte
plug, but I’ve since gone with ½ inch material both to minimize weight and for reasons
of appearance.
Cut out the outer butte plug blank, just slightly oversized. I beveled the blank
using a disk-sander on the table saw. It’s much easier to bevel off the edges of
the outer butte plug, if the blank is beveled before being epoxied on the base. Epoxy
the plug to the base.
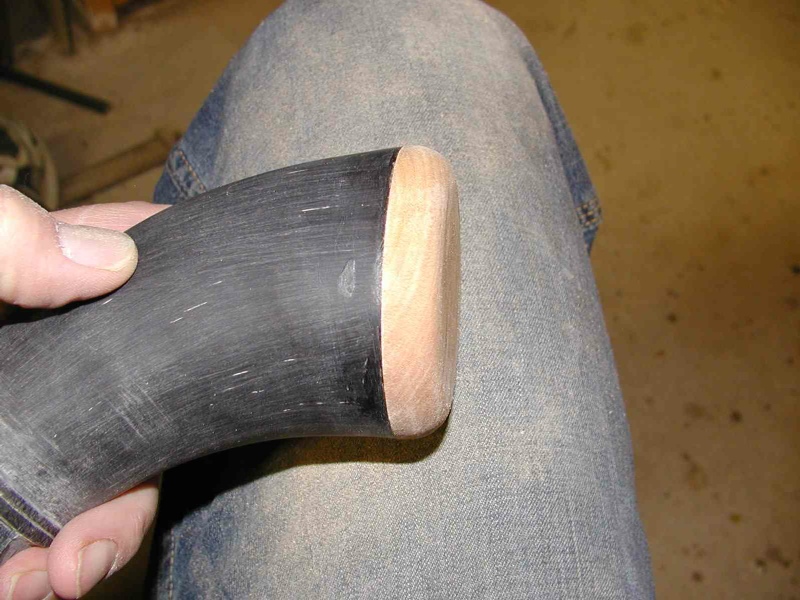 After the epoxy has cured, finish rounding off the outer butte plug using various
rasps and files. The photo illustrates how nice the join between the butte plug and
the base of the horn can be made using this method. Butte plugs fashioned in this
manner should be absolutely air-tight.
After the epoxy has cured, finish rounding off the outer butte plug using various
rasps and files. The photo illustrates how nice the join between the butte plug and
the base of the horn can be made using this method. Butte plugs fashioned in this
manner should be absolutely air-tight.
Carving the Horn: Historically, most powder horns were probably smooth and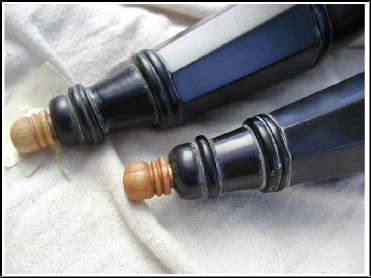 uncarved;
especially commercial production horns. Unlike the finely carved or scrimshawed
horns produced by artisans of the time, these commercial horns were strictly a tool,
to be used to extinction. Those powder horns that are preserved today in museums
tend to be those exceptional examples of craftsmanship and artistry which were recognized
as being worth preserving.
uncarved;
especially commercial production horns. Unlike the finely carved or scrimshawed
horns produced by artisans of the time, these commercial horns were strictly a tool,
to be used to extinction. Those powder horns that are preserved today in museums
tend to be those exceptional examples of craftsmanship and artistry which were recognized
as being worth preserving.
The tip of the horn is solid. Even beyond the beginning of the inner cavity, the horn will be thicker than at the butte end. Rings, grooves and facets can be worked into the horn using various rasps and files. You do need to be careful not to carve too deeply, or you’ll break through into the cavity. Carvings can range from simple rings and facets to incredibly complex patterns or effigies. Depending on the complexity of the design, carving will require anywhere from a couple of hours to many tens of hours of extra effort. However, even a simple design will add immensely to the attractiveness of your powder horn.
Laying out and Cutting Decorative Rings and Flats: This thumbnails shows a horn
I’ve started to cut the channel for the front strap and have just laid out the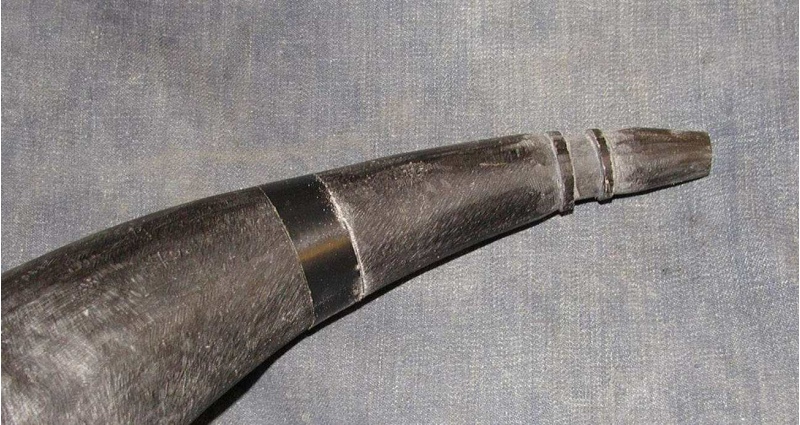 position
for one of the rings further back on the horn using electrical tape. Once the electrical
tape is on I spin the horn. If the edge of the tape doesn’t spin nicely around the
axis (that is doesn’t wave up and down), or moves back and forth as I spin the horn,
then I adjust the position till I’m happy. You can adjust the position of the electrical
tape very easily, but once you cut into the horn, you are pretty much committed (This
is a variation of the woodworkers rule "Measure twice-cut once). I use a small triangular
file to start cutting the edge of the ring and use the electrical tape as a guide.
When I’m ready to cut the other side of the ring, I reposition the electrical tape.
From experience I’ve found that I cannot cut a parallel line without a guide to
save my soul. For rounding the rings I use both needle files and a fine-toothed
triangular file. If you are having trouble with the file slipping and marring the
surface of a carved area that has been completed, cover that area with masking tape.
position
for one of the rings further back on the horn using electrical tape. Once the electrical
tape is on I spin the horn. If the edge of the tape doesn’t spin nicely around the
axis (that is doesn’t wave up and down), or moves back and forth as I spin the horn,
then I adjust the position till I’m happy. You can adjust the position of the electrical
tape very easily, but once you cut into the horn, you are pretty much committed (This
is a variation of the woodworkers rule "Measure twice-cut once). I use a small triangular
file to start cutting the edge of the ring and use the electrical tape as a guide.
When I’m ready to cut the other side of the ring, I reposition the electrical tape.
From experience I’ve found that I cannot cut a parallel line without a guide to
save my soul. For rounding the rings I use both needle files and a fine-toothed
triangular file. If you are having trouble with the file slipping and marring the
surface of a carved area that has been completed, cover that area with masking tape.
This picture shows the roughed in rings, octagonal flats a nd front strap channel.
I use both a flat fine toothed file and straight edged wood scraper to form the
flats. Octagonals seem to be about optimum for flats. Fewer sides than that, and
a lot more of the sidewall thickness has to be removed in the center of the flat,
more than that and the flats seem to lose definition. Cutting the flats is an eyeball
kind of a process. I usually start with a flat on the backside of the horn (The
outside curve) between two rings that have been previously cut. I rough in enough
to have a flat surface to transfer a parallel flat to the inside curve. I use a
micrometer-type caliper to verify that I've got (roughly) parallel surfaces. Then
with the caliper gripping both roughed in surfaces I rough in a surface at 90 degrees,
likewise for the fourth surface. Next I'll eyeball in the location of a 45 degree
flat roughly halfway between two of the 90 degree flats. Work on getting this flat
as close to 45 as possible as all the others will be based off of it. If its not
exactly 45 degrees no-one will notice as long as you are satisfied with it. Repeat
the procedure with the caliper for the remaining flats. At this point you will have
eight flats, each separated from the other by a strip of horn which is still round/semi-round. Gradually continue
to file each of the flats deeper, as you do so, the edges of the flats will come
together. After all of the flats have come together, if one is narrower than the
others, continue to deepen it. And if one flat is wider than the others then deepen
the adjacent flats. Eventually you'll have eight flats with relatively uniform widths.
nd front strap channel.
I use both a flat fine toothed file and straight edged wood scraper to form the
flats. Octagonals seem to be about optimum for flats. Fewer sides than that, and
a lot more of the sidewall thickness has to be removed in the center of the flat,
more than that and the flats seem to lose definition. Cutting the flats is an eyeball
kind of a process. I usually start with a flat on the backside of the horn (The
outside curve) between two rings that have been previously cut. I rough in enough
to have a flat surface to transfer a parallel flat to the inside curve. I use a
micrometer-type caliper to verify that I've got (roughly) parallel surfaces. Then
with the caliper gripping both roughed in surfaces I rough in a surface at 90 degrees,
likewise for the fourth surface. Next I'll eyeball in the location of a 45 degree
flat roughly halfway between two of the 90 degree flats. Work on getting this flat
as close to 45 as possible as all the others will be based off of it. If its not
exactly 45 degrees no-one will notice as long as you are satisfied with it. Repeat
the procedure with the caliper for the remaining flats. At this point you will have
eight flats, each separated from the other by a strip of horn which is still round/semi-round. Gradually continue
to file each of the flats deeper, as you do so, the edges of the flats will come
together. After all of the flats have come together, if one is narrower than the
others, continue to deepen it. And if one flat is wider than the others then deepen
the adjacent flats. Eventually you'll have eight flats with relatively uniform widths.
Removing High, Low and Flat Spots in the Lower Horn: The lower, uncarved portion of the horn may be smooth, but still may have some irregularities in shape. Hold the lower part of the horn loosely between your thumb and first finger and spin it with your other hand. Any high, low or flat spots can be detected this way much better than by a visual inspection. As you identify these areas, work them down with a rasp. It may not be possible to entirely eliminate such irregularities, but a little effort at this stage can do a lot to minimize these imperfections.
Installing Pins into the Butt Plug: Brass, iron or wooden pins can now be inserted through the horn into the butte plug. Make certain to drill holes large enough to received the pins at least through the horn. Driving the pins through the horn, or through undersized holes this close to the end will split the horn.
Final Preparation of the Horn Surface: If there are any tooth marks remaining from the rasp or coarse file remove them now with a fine file. The lower horn and flush edges of the outer butt plug can be sanded with a progression of papers from coarse to fine.
I don't use sandpaper on the carved surfaces. I find that sand paper, because of its stiffness, tends to mute the surfaces I've been trying to bring out. On the rings I use first coarse and then fine steel wool to smooth and polish the surfaces. The octagonal flats I save for last in order to get the sharpest, crispest edges. Go over the flats one last time with the flat scraper. This leaves a surface which can be directly polished with fine steel wool. You'll probably still get some rounding on the edges of the flats, but it will be minimal.
Polish: Careful work with the fine steel wool will result in a polish which if it was wood I would characterize as semi-gloss. I usually apply a thin coat of woodworkers paste wax. This leaves a lustrous, easily maintained surface.
Scrimshawing: Scrimshawing is not effective on bison horns, however is an attractive means of decorating lighter colored cow horns. Scrimshaw on horns is often used to portray animals, town scenes, maps, designs, or the owners name.
Strap Hangers: Time for some basement blacksmithing. I generally make a staple from 1/8 inch square stock steel. This stock steel can be easily shaped using a propane torch. Heat the steel until cherry red, then bend with a hammer over a vise. For a fine horn, finials can be used for a strap hanger. Finials can be made of wood, or you can use the tip of the horn which was cut off prior to drilling the spout hole.
Determine how the horn will hang from the strap. You will want to install the staple on the center line-right/left, but a little above the top/bottom centerline. This will ensure that the horn hangs naturally "bottom side down." Drill two 9/64ths holes to receive the legs of the staple. Drilling a hole which is too small will possibly result in splitting of the outer butt plug (You've got way to much effort into this project to have this happen now) If in doubt, start with a piece of scrap wood the same thickness as your outer butt plug, you can always pull the staple out. Also, be sure that the spacing of the holes is the same as the staple legs. To close or to far apart will place undue strain on the butt plug, again possibly resulting in splitting. Gently tap the staple into the holes. I always add a drop of epoxy prior to setting the staple.
Making the Spout Plug: I make spout plugs or stoppers using 3/8th or ½ inch “hardwood” dowel. Start working with the entire length of dowel, its much easier to hold than a piece which is the final length. To form the insert end of the plug start by scribing a line with a knife about ½ inch from the end around the circumference of the dowel. Work down the end of the dowel until there is enough of a shoulder to hold a flat file against. Continue working down the end by rolling the dowel while holding the file against the end until it fits snugly (not tightly) in the spout hole. Remember wood swells and shrinks as humidity changes and you don’t want a swelling plug splitting the horn. Cut off the end of the dowel about one inch from the end. I have access to a drill press which I use as a mini-lathe. Chuck the insert end of the plug into the drill press. A series of rings, and spheres can be carved into the spout plug using a combination of triangular and needle files. When the desired shape is obtained, the wood surface can be smoothed with sandpaper while the drill continues to run.
After I’m finished shaping the spout plug, I soak it in linseed oil overnight. I can’t claim any evidence to support this, but its my opinion that soaking in oil will reduce shrinking and swelling of the plug due to changes in humidity. Check the fit of the plug in the spout hole. If soaking in oil has cause the plug to swell, file it down till it fits “snugly.” You don't want the stopper to fit too tightly in the spout as it will create stresses on the spout which may eventually lead to cracking.
Show Off Your Horn: You've done it! It's finished and its a work to be proud of. You've earned yourself some bragging rights. Wear it proudly to your next rendezvous or shooting event.
For a more informative guide to making powder horns see :
Recreating the 18th Century Powder Horn by Scott & Cathy Sibley. The Sibleys describe the tools, methods, give tips and hints and provide numerous historical examples. This is a great guide and starter.
Back to the Top
Back to Skills and Plans